Sunday, April 11, 2010

Building Bones and Beautifcation

4-11-10

Finally after loosing a few weekends to holidays and weather, it was time to jump back into our Shasta. I decided to prime and paint the edge of the icebox that had rusted over the years. I taped everything off, even on the inside just in case there is over spray.
I taped newspaper inside and on the edges of the icebox to keep the paint off all the precious places. I put two coats of primer down before adding the colored paint.

After several coats of brown, I let it dry and revealed a new, shiny paint job. Good for another 50 years...I hope! BTW, that isn't over spray inside the icebox, it's chipped paint and paint dust that floated in there. Yep, that's a baking soda box in there. Even though it has been completely open for over a month now, it still has a "fishy" smell. I haven't bleached it yet, so I'm holding out hope I can make it fresh someday.

I moved to the wheel well. I used a wire brush to knock off the small amount of rust and flaking paint. This is a "just for me" project since it will covered by seating and will never be seen.

Here is the first coat of primer.

The final product. I love knowing she's pretty even in the secret places.

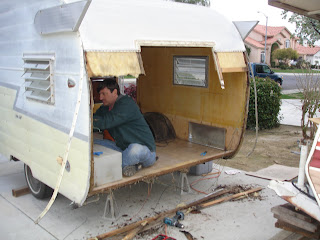
So while I was fumigating myself in the front corner of the Shasta, Dennis was working on the bones of the girl. Here he is making a patten to use to cut out the plywood on the back edge.

Once he cut out the sections for the boards he cut the curve while it was on the trailer. The other side he did first and on that side he cut the curve BEFORE he installed it. He wasn't happy that the curve wasn't perfect with the skin curve, so on the second side he decided to cut it on the rig. He was much happier with the finished product. I was worried that he would cut the siding but he was very careful and did a great job.

Knowing my husband, he standing there looking at something that isn't just right. I did hear him say today, "Maybe I'm over thinking this and I shouldn't be too critical." That's a great first step.


Monday, March 22, 2010

The Sanding Begins

3/21/10
Very little was accomplished this weekend because my hubby had to work over the weekend and I had a church event all day Saturday. I did squeeze out a few hours on Sunday afternoon to begin sanding the varnish off the kitchen cabinets. I was surprised how easily the varnish came off the wood. I also sanded the rusted metal parts of the icebox so that I can prime and paint it later. Though I am disappointed that my trailer project isn't further along due to weather and extracurricular events I am happy that something got accomplished this weekend.


I think the cabinets look great, I love the wood! It really is what made us fall in love with this year of Shasta.

I did do another big thing this weekend. I made reservations to the "Run to the Top" trailer rally June 24-27th in Wrightwood, Ca. It is our self appointed deadline to get her road ready and as beautiful as we can before then. We are very excited to attend our first rally and see all the trailers and meet other enthusiasts there. So here's to deadlines!

Tuesday, March 16, 2010

Day 2 Diggin' In

Workday 2 started slow, every muscle in my body ached from the activities of the day before. Who knew you could get such a great workout from demolishing a soda can with wheels? I didn't sleep much that night because all I did was lie in bed thinking about the big plans we had in store for our girl. One thing I did accomplish in my late night planning season was a name. I kept trying to think up some name that would go with the fact that Shasta trailers have wings. I kept thinking of Angel names but nothing seemed to fit quite right. Dennis and I had finally agreed on a color (I let him pick) the day before, she was going to be white on top and lime green on the bottom. So with that in mind I went back to naming her. At some point I thought of other things that had wings... oh, fairies have wings...green fairy... Tinker Bell! Cute, little, has wings, is green and has a little attitude just like our trailer! It is perfect! Whew! Dennis kept saying he was going to name it "Red Bull" cuz it "gives you wings!" Now you know why I let him pick the color, so I could let him have a "win" and I could keep holding the trump card for the next thing he cooked up.


Most of this day Dennis used up by taking out windows and pulling out rotten wood. He pulled out the water tank so he could work more easily on the side wall. By the end of the day our Shasta closet was full of aluminum parts and pieces. He took down all the globes so they wouldn't get broke. We think only one is original. The electrician in him decided to rewire the whole trailer, he wanted to make sure everything was safe and new. Since he was wanting to add more plugs anyway he might as well start from scratch. I'll sleep better knowing it's his wires running from point A to point B anyway. After poking and prodding around in our trailer and getting to know her real well, we were still puzzled by some of the vents and a metal panel on the front of our trailer that seemed to lead to nowhere. We had seen two vents on another 61 Shasta Compact online, so we figured that it must be factory. (I know all you renovation vets reading this already see where this is going) Okay, grab the screw gun let's see where this goes. Will it help us get this icebox out from it's wooden tomb? Surprise, surprise! One vent covers a small dent on the driver's side the other is there for visual balance. Now that big metal panel...oh...it covers a HUGE dent. I later read online about the other Shasta I had seen with the vents on the front of his trailer...come to find out, his was covering a dent too! Funny. Dennis and I are thinking at this point, we are going to pull the big dent out as best we can and then put some diamond plating on the lower third to cover it up. We don't want to go too high because it will compete with our Z stripe. As for the two vents, they are cute enough so I think they will get painted and stay.


Dennis took the wings off of Tinker Bell so he could start working on all that rotting wood on the side. No sooner did he take them down than I had my polishing cream out and ready to go. I sat in the back of my Tahoe in the church parking lot for 2 hours, while my son's youth group met, polishing away at them. Below is a before and after. I want to work on them a little more. I think there is still room for improvement.

Monday, March 15, 2010

Just Photos


Day 1 Beautification


3/6/10


While my husband was ripping the trailer apart, I got to the big job of making 50 years of dirt and grime disappear. After I was done sweeping up the seating and carpet mess I started pulling out drawers. I vacuumed out an abandoned mouse nest (thank God it was abandoned) from under the icebox and all the treasures her and her little family left behind. With Clorox Clean Up in one hand and a sponge in the other I dove into the dark recesses of the cabinets. There I found a can of Mayfresh Cola that was lodged behind the icebox for who knows how many years but from the look of it my guess is probably 45 years. That was an exciting find, much better than the mouse nest! Then I looked at my drawers. What to do with these? The Germ-o-phobe beat out the Historian on this one folks. I just was much happier with the thought of my silverware & towels sitting on fresh paint. The green stains from the rat poison had a lot to do with my decision to put a layer of latex between me and the wood.


Once my painting was finished it was time to hit that Z stripe! Out came the Mother's Aluminum Polish and my mouse sander with a "Scotch Brite" type of pad & I went to work. Wow! It shined up nicely! But that shine is a blessing and a curse. Who doesn't want that sparkle? However, with it comes showing every wrinkle and crinkle she has. It the same feeling you get when you are trying on a bathing suit at the department store...everything dimple is magnified. Also, though it's difficult to see it the pictures, there are little tiny pits that I cant seem to buff out. I'm really wanting those pits out so it shines like on another reno I've seen online (Yeah, Red Dirt!), but I'm not sure how to achieve that yet.


All in all, it was a great first day. We are so excited to be working on bringing our little lady back in shape and are dreaming about our first field trip with her!

Day 1: Destruction


3/6/10
The first item on our list was to take out the awful late 70's aftermarket seating/sleeping area. The builder of this little units used 5 different screw types so it was a frustrating demo project as we had to keep changing the bits on our screw guns. Once it was out we hit the carpet! It smelled better with just those two little improvements! Now we could see some of her little secrets. She still had her original 9x9 tiles. I started cleaning them up to see what they would look like. Nope! Still looks like a dirty floor, so it will be one of the few original details to be covered by us in the future.


Next Dennis carefully took out the back window and cut out the back panel in hopes that the only water damage was to the panel only. No such luck. The wood supports in the back crumbled to the touch. Before we knew it, the whole back skin was off and we were elbow deep in full on renovation project. Since we were not looking at a quick fix anymore, we decided to take parts of the side wood panels out as well because they too had some stains and we wanted to be sure we didn't have rotting wood issues hiding there either. One side was in good shape the other was going to need old wood strips taken out as well. Our children were horrified when they walked out to see what we had done, and if not for wonderful bloggers and You Tubers I think I would have seized up myself. Those pioneers gave us the courage and confidence to go through with this adventure.

Our Journey Begins


3/2/10

Our little jewel was found after weeks and weeks of looking at classified ads and hundreds of Craig's List postings. She was found two hours away in Hanford, California. We were delighted to see that she was in pretty good shape and about 3/4 original. The seller was asking $850 and was getting call after call while we were looking her over so we knew there would be no chance for bartering. After a complete inspection and a little "ride" as both my husband and I stood in the back of the trailer without trailer jacks (whoops) we sealed the deal and hooked her up for the ride home. We were so excited with our little treasure and I trolled the Internet the whole ride home looking for anything Shasta as we talked about our plans for her.